Installation
This page provides a detailed walkthrough of the NexusFlow installation process. NexusFlow consists of two components that need to be installed separately:
- Desktop App — Free, downloaded from GitHub
- UE Plugin — Purchased from Fab.com and installed into your UE engine
Prerequisites
| Item | Minimum Requirement |
|---|---|
| Operating System | Windows 10 / 11 (64-bit) |
| Unreal Engine | Unreal Engine 5.6 or 5.7 |
| LLM API Key | OpenAI / Anthropic / Google Gemini / DeepSeek / Zhipu GLM / MiniMax / Qwen / Kimi supported |
| Network | Internet connection required for AI model API calls |
UE Version Compatibility
NexusFlow requires UE 5.6 or 5.7. UE 5.5 and earlier are not supported because they lack ONNX Runtime 1.20+, which is needed for the RAG embedding model.
Install the Desktop App (from GitHub)
The NexusFlow desktop app is completely free and always will be.
Download
Go to the GitHub Releases page and download the latest .exe installer.
Install
- Double-click the downloaded
.exeinstaller (NSIS installer) - Select your preferred language (Simplified Chinese / English)
- Choose whether to install for the current user or all users
- Follow the setup wizard to choose an installation directory
- Complete the installation
After installation, launch NexusFlow from the Start Menu or desktop shortcut. On first launch, a floating ball icon will appear on your desktop and the first-run setup wizard will guide you through configuration.
Install the UE Plugin (from Fab)
NexusFlow requires a companion plugin installed in the UE Editor to communicate with the engine. The plugin is available on Fab.com.
Option 1: Install from Fab (Recommended)
- Purchase the NexusFlow plugin on Fab.com
- In the Epic Games Launcher, go to your Fab Library
- Find NexusFlow and click Install to Engine
- Select UE 5.6 or 5.7 as the target engine version
- Restart the UE Editor
Option 2: Manual Installation
If you have the plugin as a zip file:
- Close the UE Editor
- Extract the
NexusFlowfolder into your UE project'sPlugins/directory - Reopen the UE Editor
- Go to Edit > Plugins, search for "NexusFlow", and confirm it is enabled
Verify Plugin Installation
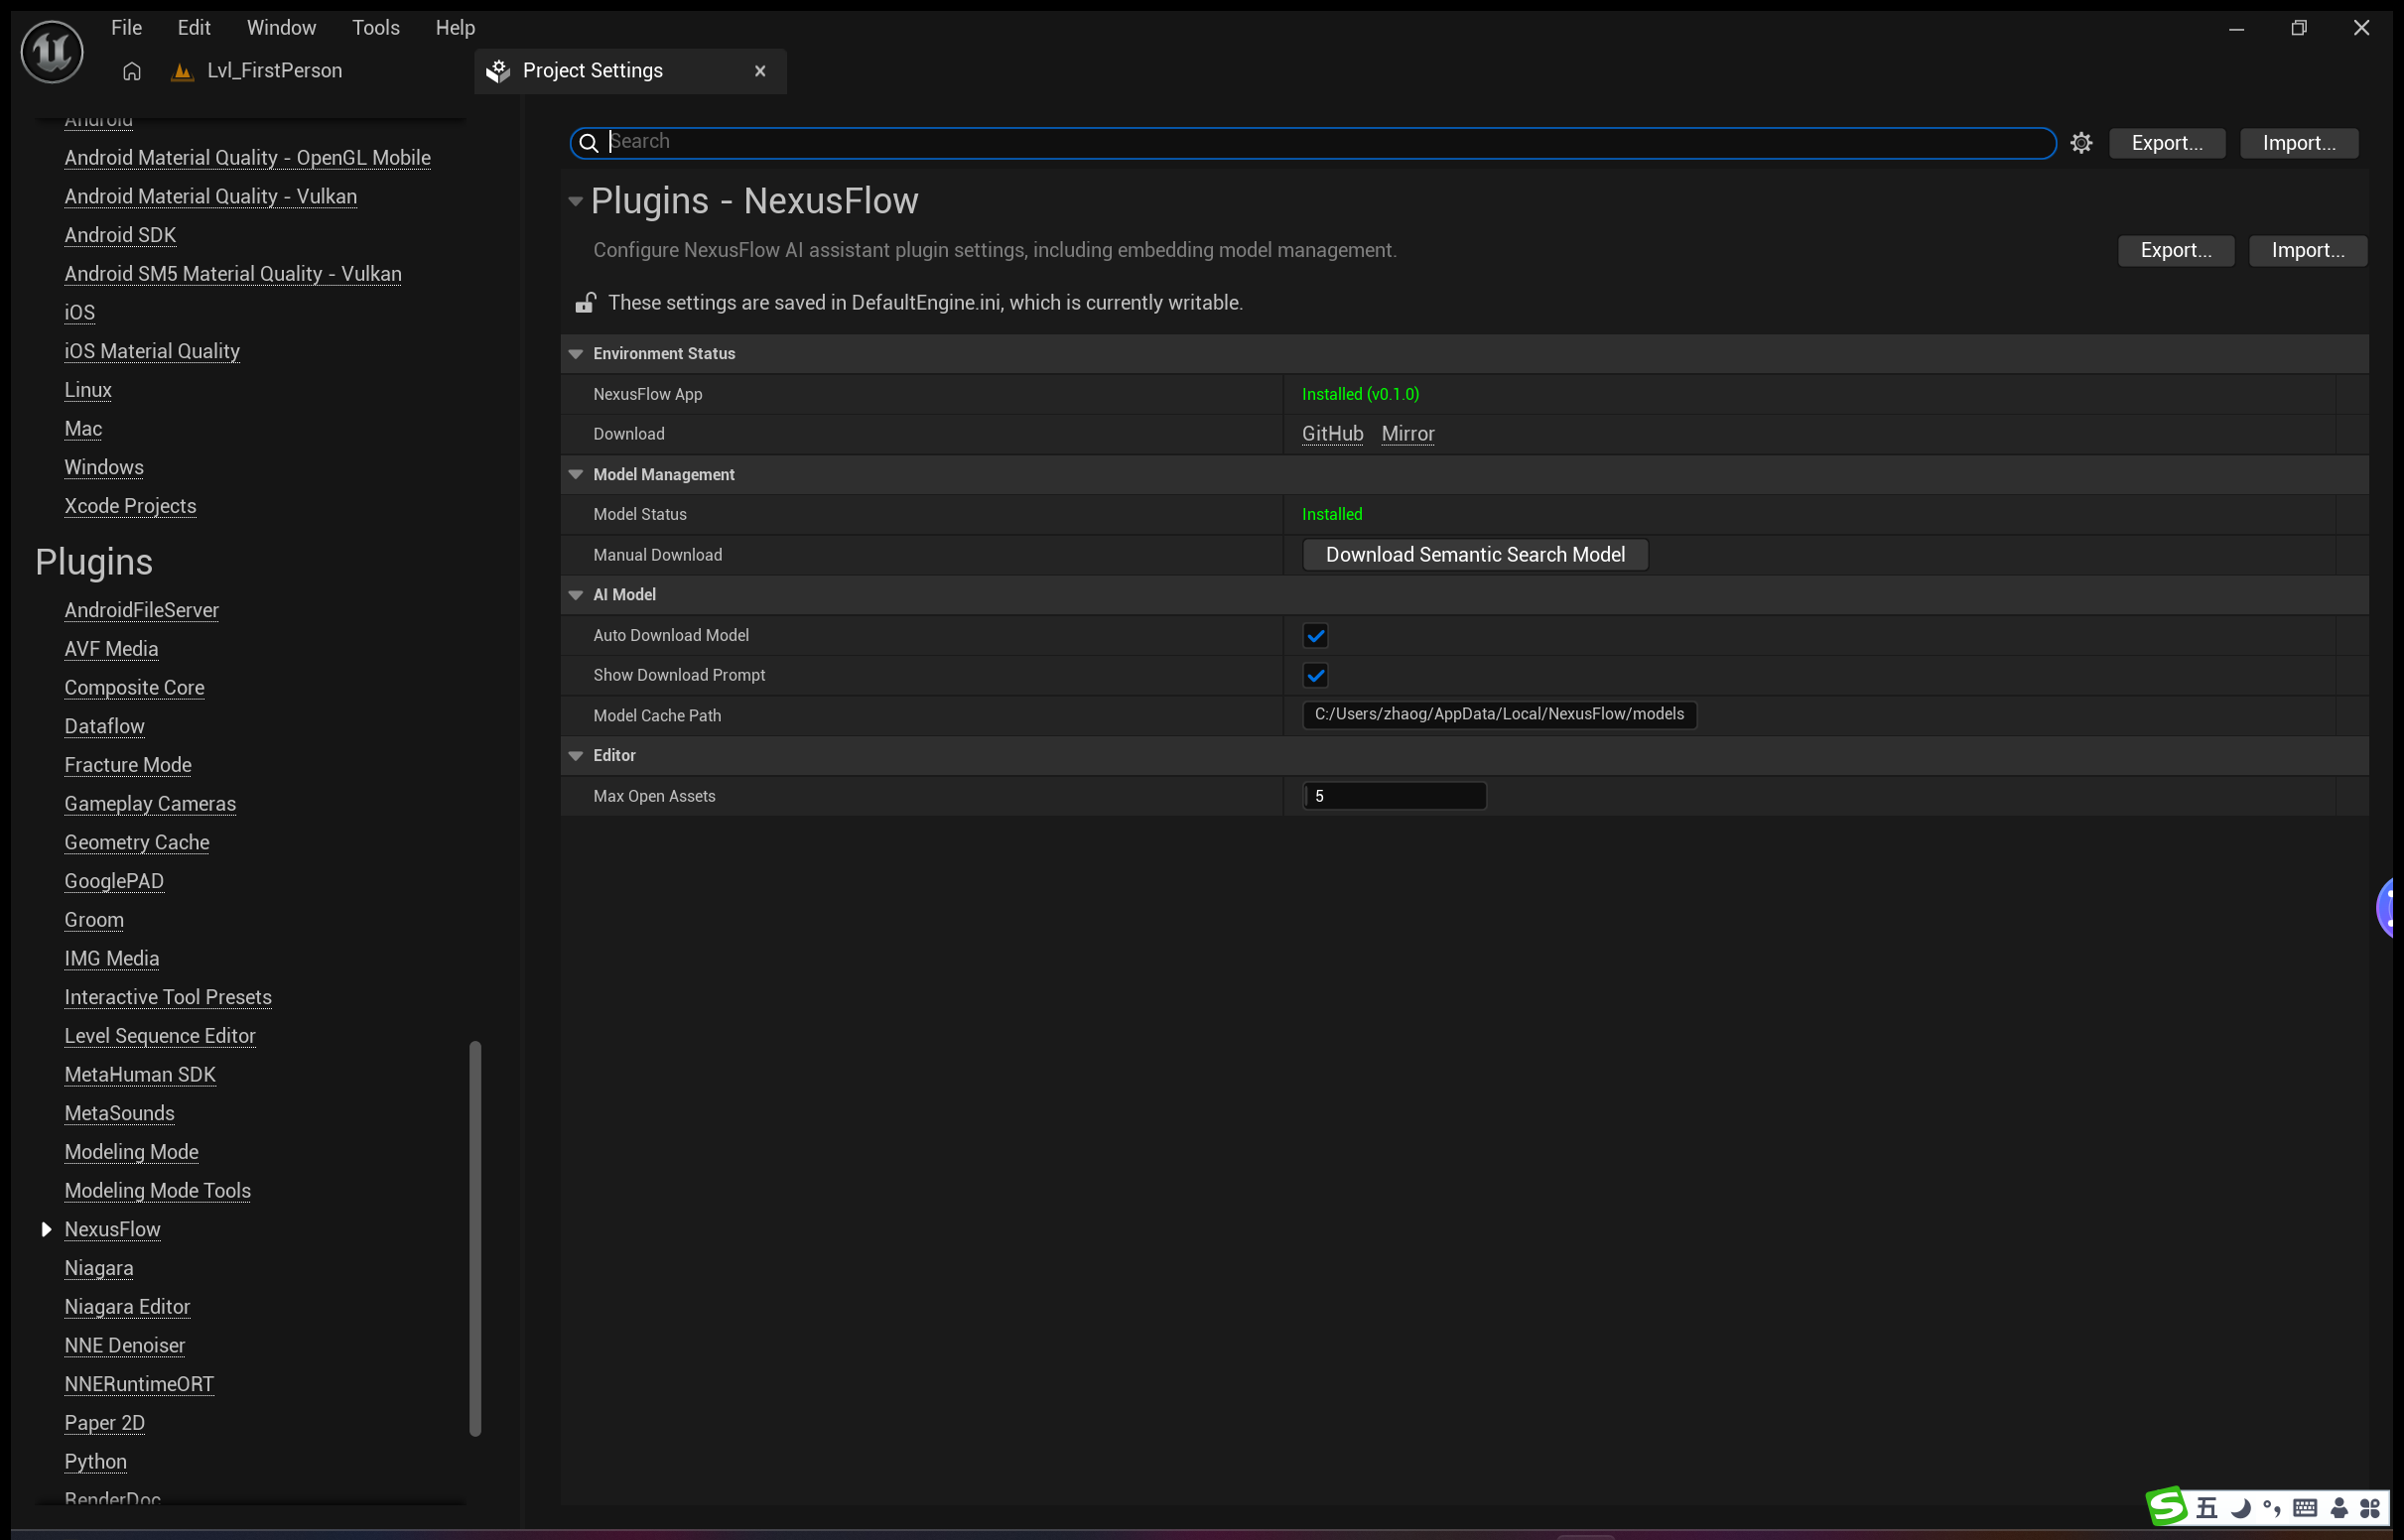
You can check the plugin installation status from NexusFlow's Settings > About page:
- ✅ Plugin detected — Installation successful
- ❌ Plugin not found — Review the installation steps or reinstall
Click the "Re-detect" button to manually refresh the detection result.
UE Plugin First Launch
When the UE Editor starts with the NexusFlow plugin installed, the plugin automatically checks your environment. If anything is missing, a NexusFlow Setup dialog appears.
What Gets Checked
| Item | What It Checks | How |
|---|---|---|
| NexusFlow Desktop App | Whether the app is installed on this machine | Windows Registry lookup |
| Embedding Model | Whether the RAG search model is ready | Bridge FFI status check |
When the Dialog Appears
- Everything ready — No dialog; the plugin starts silently
- Something missing — The setup dialog appears after a short delay (~2 seconds)
- "Don't Show Again" was selected — No dialog, even if items are missing
Dialog Options
| Button | Effect |
|---|---|
| Download Model | Starts downloading the embedding model (~90 MB) in the background |
| Open Settings | Opens Project Settings > Plugins > NexusFlow for manual configuration |
| Later | Dismisses the dialog; it will appear again on next startup |
| Don't Show Again | Permanently hides the dialog (can be re-enabled in settings) |
Not-Installed App Links
If the NexusFlow desktop app is not detected, the dialog provides two download links:
- GitHub — Releases page
- Mirror — Accelerated download link for users in China
Re-enabling the Setup Dialog
If you previously clicked "Don't Show Again" and want to see the dialog again:
- Navigate to the NexusFlow config file:
%LOCALAPPDATA%/NexusFlow/config.json - Set
"showSetupWizard": true - Restart the UE Editor
Alternatively, you can check environment status at any time in Project Settings > Plugins > NexusFlow.
Configure AI Models
NexusFlow requires at least one AI model to be configured before use. There are two ways to set this up:
Option 1: First-Run Wizard
On first launch, Step 2 of the wizard will guide you through AI model configuration. See Quick Start for details.
Option 2: Settings Page
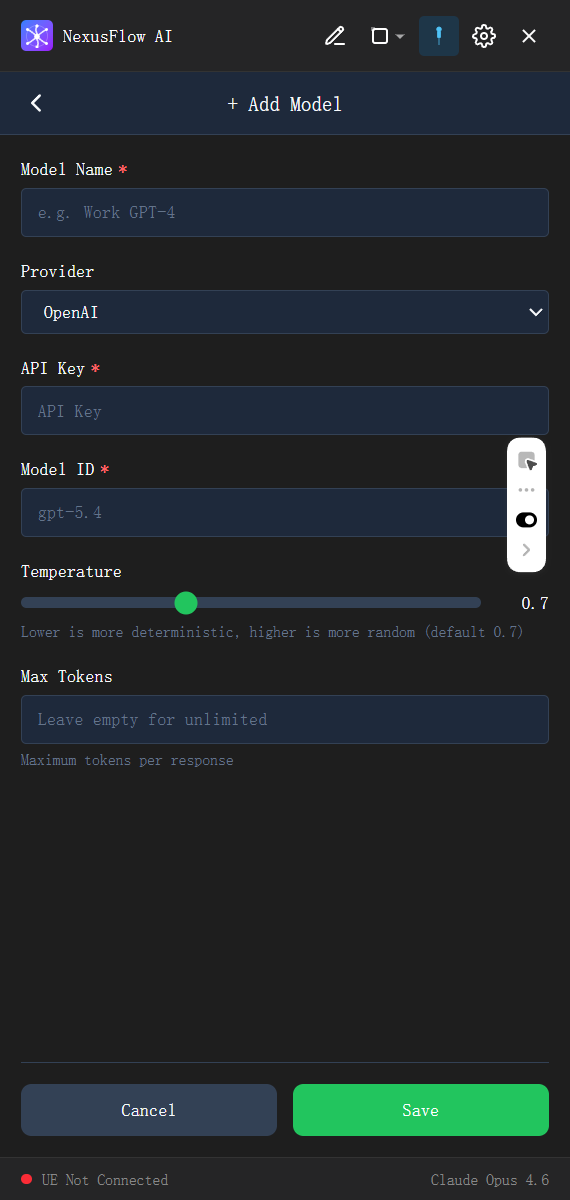
- Click the gear icon at the top of the sidebar to open Settings
- Select AI Models
- Click "Add Model"
- Fill in the configuration fields (see below)
Supported AI Model Providers
| Provider | Example Models | Notes |
|---|---|---|
| OpenAI | gpt-5.4, gpt-5.3-codex | OpenAI official API |
| Anthropic | claude-opus-4-6, claude-sonnet-4-20250514 | Max Tokens is required |
| Google Gemini | gemini-3.1-pro-preview, gemini-2.5-pro | Google AI Studio API |
| DeepSeek | deepseek-chat, deepseek-reasoner | Cost-effective option |
| Zhipu GLM | GLM-4.7, GLM-5 | Model names are case-sensitive |
| MiniMax | MiniMax-M2.7, MiniMax-M2.7-highspeed | Max Tokens is required |
| Qwen | qwen3-max, qwen3.5-plus | Alibaba Cloud DashScope API |
| Kimi | kimi-k2.5, kimi-k2-turbo-preview | Moonshot API |
| Custom | User-defined models | Supports any API compatible with the above protocols |
Configuration Fields
| Field | Required | Description |
|---|---|---|
| Provider | ✅ | Select the model provider |
| Model Name | ✅ | Custom display name shown in the model list |
| API Key | ✅ | API key provided by the provider |
| Model ID | ✅ | Model identifier, e.g., gpt-5.4 |
| API URL | Required for Custom | Custom API endpoint URL |
| Protocol | Required for Custom | OpenAI Compatible / OpenAI Responses API / Anthropic Messages API / Google Gemini API |
| Temperature | Optional | Generation randomness (0–2); higher values produce more varied outputs |
| Max Tokens | Optional* | Maximum output tokens. *Required when using the Anthropic protocol |
TIP
You can add multiple models and set one as the default. Click a model card in the list to view its details and manage it.
API Key Security
API Keys are displayed in masked form (sk-****) in the UI. Click the eye icon to toggle visibility. API Keys are stored locally and are never uploaded to any server.
Verify Your Setup
After installing both components, run through this checklist to confirm everything is working:
- Launch NexusFlow — The floating ball appears on screen
- Click the floating ball — The sidebar opens normally
- Check models — Settings > AI Models shows at least one model with a passing validation status
- Launch UE — The sidebar status bar shows a green connection indicator
- Send a message — Try typing "Hello" to confirm the AI responds
If you encounter any issues, see Troubleshooting.